A place to write down my rambles to try and stop me talking to myself...
out loud...
in front of strangers....

Thursday, 28 April 2011

Wedding Fever!

Hello, I am very excited about the royal wedding tomorrow! We are planning a garden party to celebrate, we have bunting and Union Jack plates and cups and a competition for the best crown!! Fingers crossed it stays sunny please!

#1 is having a wedding themed day at school today, she only went back yesterday after the Easter break and they are off again tomorrow and Monday, so the teachers decided to have a fun day. They get to dress in wedding attire and will be doing all sorts of fabulous things! We had a slight panic when her dress from September (when she was a flower girl) didn't fit anymore but we found a better long dress so she has gone dressed as a bride instead!


From September


This morning! A bit bleary eyed still, bless her!

I made the flowers last night using crepe paper, clear wrapping paper, pipe cleaners, ribbon and some thin protective foam wrapping that our new DVD player came in! Random right??


They were really simple, cut 3 circles of paper in decreasing sizes for each flower (I used 2 clear and a pink crepe in between and made 3 flowers), pinch together at the centres and attach to pipe cleaners (I used tape as it is hidden). I then cut out leaves from green tissue paper and arranged around the flowers, securing again with tape. Then I cut a circle of thin foam with a slit to the center and rolled it into a wide cone around the flowers and secured with ribbon. Done!


I also made a quick veil! using the same thin foam, I simply cut a rectangle, pleated one end and stitched the pleats in place. I used wool to stitch to prevent it ripping.


I left tails of wool to tie it into her hair and cut the bottom edge into a slight wave. When I put it in her hair I tied a ribbon over the pleats to make it look even prettier!


Simple and free so if it get trashed at school, who cares???

Need to go and do some baking for tomorrow, it going to be very English...cream cakes, cucumber sandwiches oh and Pimms of course!!

See you soon!

Photobucket

Monday, 25 April 2011

Finally some knitting...

Hello! Hope your Easter has been fabulous! We are inundated with chocolate here so we will be doing some choc based baking in the near future, Yum!

I finally managed to finish a knitting project that has been on the cards for nearly a year and which ended up taking just an evening to complete start to finish. I feel a little ashamed that I have taken so long to do it especially as it was requested my friends beautiful daughter!

So here it is, Ruya's Hairband...


It is super easy and there are similar patterns out there but this is how I did mine

With DK on 4.5mm dpns cast on 3 stitches and work about 6" i-cord

Inc in each stitch

K1,inc 1 across (9st)

Work in moss stitch (K1,P1) for desired length, (from the bottom of one ear to the other in this case)

K1, K1tog across

K2tog across

Work i-cord to 6"

Weave in ends. Done!

I added a knit flower too but embellish as you see fit!


Without flower


With flower and a button.

Can't wait to give it too her, I hope she still wants one!!!

Am super excited as Hubby has just finished making me a sewing area! Can start working through my stash of material at last :-)

See you soon!


Photobucket

Thursday, 21 April 2011

Update...

Hi, just a quick one to show some photos of the finished newly named teatowel caddy! Excuse the photos but there is still a lack of nails so the washing line obligingly stepped in as a prop!

The striped one is one I ran up this morning in about 15 mins tops! So much easier as all I had to do was fold them in half and stitch them together!

Am also including some pics of #1s Easter card she made for school, she drew the outline, I glued and cut the wool to length and then she went all designer on me! One proud mama!


See you soon!

Wednesday, 20 April 2011

Time for Tea

I dusted off my sewing machine today!! Look what I made....


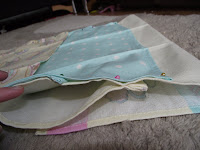
What is it I hear you ask? (Not just you, Hubby said it too!)  Well its a tea towel hanging holder thing of course! A friend of mine has a shop bought one, its just a series of looped material used for storage, in her case tea towels. I wanted one as I have lost a drawer in my kitchen to tea towels and dish cloths and all my utensils are fighting for space in one very cramped drawer!

The same friend had given me some yummy tea towels as part of my Birthday present...


I loved them too much to use, I didn't want them all stained and burnt and faded! So of course in my mind they were the perfect material to use to make a holder! Here's what I did....
Well the condensed version as I pinned it all together and then had to unpin it again in order to be able to sew it how I wanted!


This is it pinned...
There are three towels, the bottom two are folded wrong sides together leaving about 1/4 spare at the top, the top one is folded about in half so there is a flap over the top. This is optional, it just worked for the best with my towels to keep the pattern the right way round!


The towels were then stitched together leaving the edges open for putting things in, and two bits of ribbon added for hanging it up


Done! I just need Hubby to get his hammer out now so I can hang it up and clear my drawer!

Hope you love this as much as I do!

Photobucket

Photobucket

Thursday, 14 April 2011

Easter Holidays!

Well, its half term again! I always look forward to spending time with my girls and most of the time its fab but today they are driving me bonkers! I thought a bit of crafting would help them play nicely but they are fighting over glue sticks, lying on each others cards and now throwing things at each other!! Go away rain we need some outdoor running around!

Before the fighting started we made some lovely Easter gifts for friends and cousins, here's what we did and how we did it....


We started with some cardboard tubes, cut them in half and stuck coloured paper to them. You could paint them I guess but it was quicker and cleaner for us to cut and stick!


The over hanging edges were slit and folded under each end


Each covered tube was then stuck to a cardboard base


Features were added, wings and beaks and little feet for chicks...


And ears and carrots and bigger feet for bunnies!


We added cotton wool balls for tails too! We shredded some yellow paper and stuffed the tubes with it to make a nice soft nest for some chocolate yumminess!

All in all a fun rainy afternoon, we will definately make these again, I am already thinking of ways to customise them for the royal wedding....and Halloween...and Christmas....

Hope you love them as much as I do!
See you soon

Rea


Photobucket


Black Kats Design


Suzy's Artsy Craftsy Sitcom


Visit thecsiproject.com

Monday, 4 April 2011

Manic March!

It has just been crazy round this way just lately! It has been an emotional roller coaster too, what with a funeral, birthdays, holidays and then the discovery of a serious illness in a school teacher. All in all there has not been much knitting happening! I did manage to finish some legwarmers while we were away...just not the ones I blogged about before! They are my own design, nothing spectacular but will give you the pattern anyway! I knitted them plain but they are easy to customise.

So....Easy Peasy Legwarmers....

In Dk weight on 4mm straight needles


To fit a 5 year old
Cast on 46 stitches
K2, P2 ribbing for 12 rows. (this will give you a knit stitch at each end but I seam using mattress stitch giving a neat K2 ridge at the seam)
Stocking stitch for 6 rows
Inc 1 at each end of row (RS, 48st)
Purl row
Inc 1 at each end of row (RS, 50st)
St st for required length (about 9")
Dec 1 at each end of row (48)
Purl
Dec 1 at each end of row (46)
St st 6 rows
K2, P2 rib for 12 rows
Cast off

That's it, easy peasy! I hope this works well for you, my little one is pleased as punch with them.

Good Luck

See you soon with some Easter crafts we have been up to
Rea x